Preparing your image for the web
How do you prepare an image for the web? Here are some quick and easy tricks in Photoshop to make your image pop.
Cropping considerations
Cropping your image well will set it apart, and can take a mediocre photo and make it great. Here are three things to consider when you are cropping your photo.
Subject
What is the primary subject of the photo? Are there any distractions present in the photo-taking away from your main subject? Crop your image to remove distractions and make sure the subject of your photo is the first thing people see.
Framing
Framing can happen in a couple of ways. This can be architectural elements on the sides of your photo that frame the subject, tree branches, or other objects that are not the subject, but help to better frame the subject of the photo, making it stand out more. If you have a photo that is too zoomed out, you might be able to crop in and use other elements in the photograph to better frame your subject.
Rule of Thirds
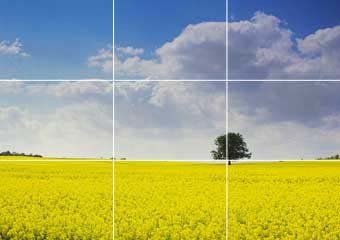
The Rule of Thirds is a photographic composition technique that is widely used in the photography community. To understand the rule of thirds, imagine that your photograph is divided into 9 equally sized sections, with 2 lines vertically and 2 lines horizontally (see below). The intersections of these lines are good places to center your subject.

Image adjustments
I typically do minor post-processing adjustments to my photos in Photoshop or in Preview (Mac). Unless you are starting with a truly professional photograph, you may need to make these adjustments to help your image "pop."
Levels

In Photoshop —
- Open your image in Photoshop.
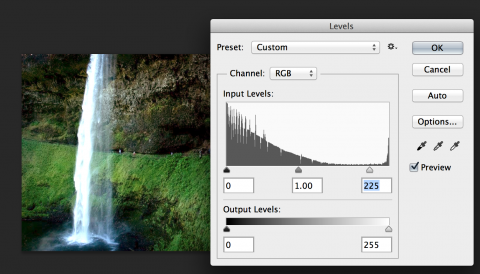
- Go to Image > Adjustments > Levels (or use a Levels adjustment layer – see the little half-full/half-empty icon in the bottom of the layers panel?)
- You will see a diagram of the levels of your picture. To brighten, slide the arrow on the far right of the diagram inward to the middle until it looks brighter. To darken, slide the arrow on the far left of the diagram inward. Use the arrow in the middle to adjust the image's contrast overall.
- Click "OK" to confirm. Using an Adjustment Layer will not destroy your original image! Otherwise, be careful to save a new version, keeping the original image untouched.
In Preview —
- Open your image in Preview (Mac only).
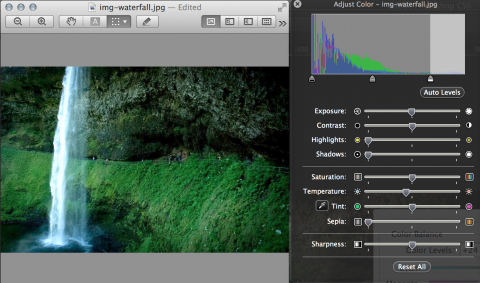
- Go to Tools > Adjust Color
- Either: Use the arrows on the left, middle, and right of the levels diagram at the top (see instructions above for Photoshop, as these are the same), or use the Exposure slider to brighten/darken, or use Auto Levels.
- Make sure to save a fresh copy so you don't override your original image.
Color Balance

In Photoshop —
- Open your image in Photoshop.
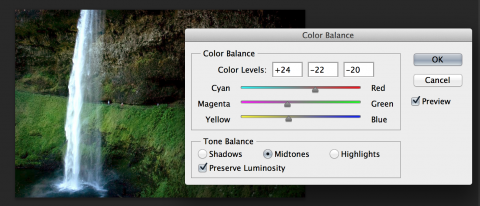
- Go to Image > Adjustments > Color Balance (or use a Color Balance adjustment layer– see the little half-full/half-empty icon in the bottom of the layers panel?)
- For each of the tones (shadows, midtones, highlights), slide each of the RGB sliders slowly left and right to find a more balanced color tone for the image. I typically slide them back and forth, seeing extremes on both ends, and then try to find the neutral-feeling "middle" where the color of the photo looks neither one way or another.
- Toggle on and off the preview to see how this is effecting your image.
- Click "OK" to confirm. Using an Adjustment Layer will not destroy your original image! Otherwise, be careful to save a new version, keeping the original image untouched.

In Preview —
- Open your image in Preview (Mac only).
- Go to Tools > Adjust Color
- Use the Temperature slider to make the image cooler or warmer. You will not have as much control over color balance in Preview as you will in Photoshop.
- Make sure to save a fresh copy so you don't override your original image.
File formats
There are three main file formats to consider when saving your image for the web. In Photoshop, you'll want to use the "Save for web" option to get to the save dialogue that shows you these format options. Each file format is appropriate for a specific type of image, but the main goal is to make sure your image size is kept as small as possible without impacting the quality of the image.
JPG
The .jpg file format is most appropriate for photographic imagery. Photographs of people and places with many colors and gradients are best presented using the .jpg format, as it can preserve the diversity of color present in the photo's pixels. The .jpg format should get you the best quality balanced with the smallest file size for full-color photos.
PNG
The .png format is the format you want to use if you have transparency in your image. Choose png-24 to get the best transparency support. This format is also best used when you have a photograph combined with a vector graphic (like shapes, text, etc). The .png file format does a much better job at preserving sharp, contrasting lines than the .jpg file format when compressed. The .png format will create a slightly larger file size than .jpg for full-color photographs, but you will see better imager preservation than the .jpg format.
GIF
The .gif format is best used for things like logos and simple graphics that do not have gradients of any kind. If you have a two-color graphic or logo, you can use the .gif format. The .gif format does a great job at reducing file size dramatically for images with small numbers of colors. This is the only appropriate use of the .gif format. This format, though it can support transparency, does a bad job at the dithering so it is not recommended.
Text in your images
If you are considering this, be very very sure this is what you want, and here's why. Text in your image is not accessible and requires additional alt attribute information to help people using screen readers understand your text. If this text is critical to understanding the content of the page, it is not recommended to place the text in the image. Instead, think of text inside images as decorative, adding value to already sufficient content. Now that we have web fonts, it is even more unlikely that you will need to create an image with text inside of it, as we can now create beautiful custom typography on the web that is accessible with web fonts.